Tuesday, December 20, 2011

Changes to Mobile Video Conversion

Our Media Manager has been updated to provide a way for you to upload MP4 videos for mobile course use without having to go through the conversion process.  Customers have requested that we provide this feature because they find that videos that go through the conversion process can change in regard to quality and size.

How It Works
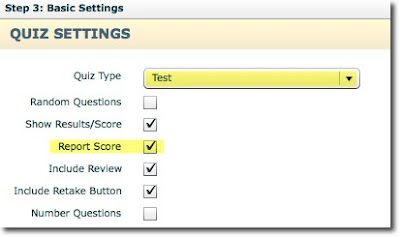
Next time you open up your media manager to upload a video to use in your course, you will see this check box on the screen:  "Keep MP4 in Original Format."

If you don't want your video to be converted, simply check this box after browsing for and selecting the video you want to use.   If this box is checked when you press "Upload Files," your video will not go through the conversion process and will maintain the original size and quality.

Warning
If you keep the MP4 video in the original format, it may not have the appropriate codec to be compatible with all mobile devices. The best practice, to ensure that the video will be compatible with as many mobile devices as possible, is to allow the media manager to convert it. Even videos that are originally in MP4 format should be converted in the media manager to make sure that it they get the necessary codec to be compatible with all mobile devices.

How Do I Know if I Can Use this Feature?
If you know your learners are using a certain mobile device, and you create an MP4 video with a codec  specific for that device, you should be able to use this feature without any problems.

If you aren't sure what device your learners will be using to access the course, if your learners will be using multiple devices, or you are using videos that are not in MP4 format, the best practice is to allow the media manager to convert it.


More Information
For more information on video formatting on mobile devices, please refer to these links:
Android media formats documentation:

Apple movie player documentation:

Apple audio documentation:

iLounge article about ipod/iphone video conversion:

Wikipedia article about mpeg-4 part 14:

Thursday, December 1, 2011

Improved Video Conversion

We have improved video conversion to enhance the videos you upload to your flash courses.  Nothing has changed about the way you upload videos, but here are a few of the benefits you will notice next time you upload and convert a video:
  • Increased quality and resolution
  • Improved audio/video syncing
  • Resolved video skewing issues


Tuesday, November 29, 2011

New Stock Images Available

New Stock Media Images in Media Manager
Next time you open your Media Manager, you will notice a new category called "Stock Media."

A wide range of "clip art" images are available for your use, including:
  • Professional people in a variety of poses.
  • Thought and speech bubbles
  • Office type clipart
  • and more!
There are some default stock images that are available to all account levels in Unison and mLearning Studio.  However, if you  notice that there are stock images in your media manager that have a watermark, that means that the stock image belongs to a more advanced level.  To be able to use that image without the watermark, you would have to upgrade to a different level.   If you are interested in purchasing a more advanced level, please contact our sales team: sales@rapidintake.com

Here is an example of one of the stock media images:

Incorporating PNG Files in a Course

Customers asked for a way to be able to incorporate images with a transparent background into Unison and mLearning Studio. We are now happy to announce that both tools now support PNG image files! This gives you a way to incorporate PNG images with a transparent background into your course (either for logos or for images that appear in the course pages).

How to Upload PNG Files to the Media Manager.  
1. Open your Media Manager.


2. Click on the "image" category

3. Hit "Upload New Image."

4. Browse for the PNG file on your computer, select it, and upload.

5. IMPORTANT: Uncheck the "convert png's to jpg" check box. If you want this file to stay a PNG and maintain the transparency, you need to uncheck this box.

6. Hit "Upload Files." The PNG file will now appear in your media manager.

NOTE: Flash Player 7 does not support PNG images. Any Unison course that is labeled a Player 7 style will not support PNG images. If you are working on an existing course that is Player 7, you will need to change it by editing the course settings.

Am I using Player 7?
If you are currently working on an existing course, you will need to check and see if it is a Player 7 style. Follow these steps:
1. Open the course in the authoring tool.
2. Click on the "Edit Course Settings" button at the top of the screen

3. Go to Step 2: Course Style. Look in the "Course Style" field to see if the style is labeled Player 7 or 8. The style in the image below is labeled a Player 7 style. This Player 7 style will not support PNG images.

How do I change the course style?
If your current course is a Player 7 style, and you want to change it, you can do so in the authoring tool after clicking on the "Edit Course Settings" button
1. Go to Step 2: Course Style. Use the pull-down tab to select a new style.
2. Check the box labeled "Update Style Files."
3. Hit the "Update Course" button at the bottom right of the screen.
4. Make sure that you clear your cache.

Tuesday, November 22, 2011

PowerPoints in mLearning Courses

For easy, step-by-step instructions on incorporating a narrated PowerPoint presentation into your mLearning course, check out this blog post.  You can also view a sample course with a converted PowerPoint.


Monday, November 21, 2011

Active Project Accounts

There are different types of accounts and levels available for purchase at Rapid Intake.  One type of account is an "Active Project" account.  When you purchase this type of account, you indicate how many "active" or "open" projects you want to be able to work on at any given time.  You can then add an unlimited number of users to work on the active projects.  When you are finished working on a project, you will change the course status to "archived," then you can start a new project in its place. The archived project will still be accessible, but you won't be able to view it or edit it unless the status is changed back to "open" or "complete."  

This post will explain the steps to take in changing the status of any course.  

Changing Course Status
Note:  Only users that are registered as "administrators" will be able to change the course status.  

After logging in to Unison or mLearning Studio, you will see a list of all the open and complete projects assigned to you in the "My Projects" home screen.  


Click on the "Admin" tab at the top left of the screen if you want to to view or change the status of any course.  


Click on the "View/Update Projects" link under the "Projects" heading.  As an administrator, you can view all projects (even the projects that aren't assigned to you) and change the course status for any course from this screen.  


Click on the name of the course to change the course status.  


Click on the status you would like to set for the course.  You can select "open," "complete," or "archived."  Click on "archived" if you are finished with the course.  This will allow you to start a new active course in its place.  If you would like to work on the course, select "open" or "complete."  
Click on the "Save Changes" button when you are finished changing the status.  


Remember, the courses that are archived will only be visible under the admin tab by an administrator.  If at any time you want to go back in to an archived course and make changes to the pages, you can still go back into the admin tab and change the status of the course back to "open."  

Thursday, November 17, 2011

Awarding Certificates based on Quiz Score

This blog post will walk you through the necessary settings to present your learners with a certificate of completion based on a passing final quiz score in a flash course.

The yellow highlights on the images below indicate the settings you must change. Each setting is explained below.

Course Settings:
First take a look at your course settings. Open the course in Unison that you would like to add the certificate to. Click on the "Edit Course Settings" button at the top center of the screen.
Go to the "Data Tracking Properties" and take a look at the settings there.
Tracking: Make sure you have the appropriate SCORM settings selected (either 1.2 or 1.3, also known as SCORM 2004)
Course Completion Status: Select "Completed."
Use Page Complete: (optional) Check this box if you want your learners to visit and complete each page in addition to passing the quiz. You can leave it unchecked if you don't need them to complete each page.
Auto Navigation: Leave this box unchecked.

Quiz Settings
Next, go to the quiz page in the authoring tool to view the settings. Go to "Step 3: Basic Settings." Most of the settings here are optional

Quiz type: Test
Random Questions: Optional
Show Results: Optional
Report Score: This box must be checked to send the quiz results to your LMS
Include Review: Optional
Include Retake Button: Optional
Number Questions: Optional
Now go to "Step 4: LMS Settings."
Record Lesson Status: Select "Pass or fail based on score"
Passing Score: Enter in the passing percentage
Minimum Score: Enter in the minimum score percentage (Note: You can set this to 1.)
Maximum Score: Enter in the maximum score percentage (Note: This will usually be 100)

Certificate Settings
The last place you need to check the settings is the certificate page.

Step 2: Certificate Options
Certificate Type: Select the type of certificate you want
Prompt for Name: Check this box if you would like the certificate to prompt the learner to enter his/her name before displaying.

Step 3 (optional): Restriction Options
Restrict Certificate: Check this box. This will restrict the learner from accessing the certificate too early.
Restriction Type: Select "Based on LMS Completion"
Course Not complete Error Text: You may want to type in a message to this field that explains to the learner why they can't access the certificate before

Tuesday, November 15, 2011

Changing the Background on the Visual Layout Page

We have had some customers ask if it is possible to change the color of the background, or canvas, of the new visual layout page.


There is not currently a way to change the color of the canvas, but there is a way to import an image from the media manager to cover the canvas.

HOW?

1.  Simply insert an image from your media manager. In this example, I used a small blue square.
2.  Use the handles around the image to re-size and stretch the image over the canvas.
Note:  If you have other media elements on the page already, make sure you click on the "Bring to Back" button so that the "background" image is layered behind all the other elements.
3.  You may have to change the default text box settings (including the transparency of the text box background or the text color) to make it easier to see.

However, if you are using an image that you don't want to distort by stretching it to fit the canvas, you will need to look up the staging size for the course style you are using and make an image to fit those specifications.

1.  The staging area specifications of the style you are using are displayed at the top center of the screen in the authoring tool.
2.  Use an image editing program, such as Photoshop (or even Paint), to size the image to the right specifications.  
3.  Upload the image to your media manager and your course.  
                 

Wednesday, November 2, 2011

Youtube Videos in Flash Courses

Have you ever wanted to link a Youtube video to your Flash course?

Here's how:
1. Add an external SWF page to your course. This type of page allows external files.
2. Locate the video you want to use in Youtube. Click on the "Share" button below the video.


3. Click on "Embed" and check the box that says "Use old embed code." You will see a long link. You don't need the entire link. Just copy and paste the part starting with http and ending with the question mark. You will need to type rel=0 (zero) after the question mark. Example: http://www.youtube.com/v/-fgpDOOWAHc?rel=0


4. Copy the necessary section of the embed code. Note: If there is anything extra (such as a quotation mark), the link won't work.


5. Double click on the "Flash SWF File" default text to activate the field.

6. Paste in the section of the embed code.
When you preview the course, you will be able to view the Youtube video playing from the external SWF page in your course.

To learn how to embed a Youtube video in a mobile course, read this post.

Youtube Videos in Mobile Courses

Have you ever wanted to link a Youtube video to your mobile course?
Now you can!
Here's how:
1. First, locate the video you want to use from Youtube.com.
2. Click on the "Share" link below the video.

3. Copy the link to the video

4. After opening up your mobile course in the authoring tool, double click on the default text in the mobile video file field to activate it.

5. Paste the link into the activated field.
When you preview the course, you will be able to view the Youtube video playing from the video page in your course.

To learn how to embed a Youtube video to a Flash course, check out this post.

Friday, October 28, 2011

New Mobile Page Types

After receiving requests for audio capability with mobile courses, we are proud to offer new page types to our mLearning users:
  • Text, Image, and Audio
  • Text and Audio
  • Image and Audio
Similar to our other page types, simply fill in the blanks, select the files you want, and the page is ready!

In addition to the new pages incorporating audio, we have also implemented:
  • Definitions Page
  • New Quiz Question Type: Multiple Correct
The Definitions Page is two interactions in one: a review and a practice. First, learners are able to review terms with their definitions. In the practice portion of the interaction the learners must make matches by tapping the term and then tapping the definition.

Review:
Practice:

The new quiz question type allows you to provide your learner with a multiple choice question that has more than one correct answer.

***Note on audio: Audio is unable to be set to play automatically. In the audio step settings, you will see a check box for "Auto Play," but when your learners navigates to the page, they will still have to hit the play button to access the audio.

Friday, September 30, 2011

Changing Video Size in Unison Courses

Our customers often notice that videos that are uploaded to Unison courses always appear the same size (and usually not the original size) in courses.


Why?
Unison allows you to upload videos in .flv, .mov, .avi, or .wmv format. All video types (except .flv) must be converted to .flv before they can be used in courses. When this conversion occurs, Unison changes the size of the video to fit in the video page template.

How to Change the Size
By uploading a video that is already the size you want in .flv format, you can bypass the conversion process. This allows you to incorporate a video in it's original size, or you could design a video to take up the entire staging area of the video template.

Here is how:
1. Course Style Size: You will need to look up the staging area dimensions of the course style you are using so you know what size your video needs to be. You can look this up on our wiki. Look up the name of the style you are using for the course. The staging area is the number in parenthesis.

2. Video Size: Now that you know the dimensions for the staging area, you can change your video dimensions to match. You will need to use a video editing tool or converter to change the size. If you don't currently have a tool, you can download a free trial of the "Any Video Converter" here. For steps on how to use "Any Video Converter," see the instructions on the image below.


3. Upload to Unison: Now you are ready to upload the video to your Unison Media Manager for use in your course. Since your video is already in .flv format, it won't need to be converted and should take up the entire staging area, like this:


Sunday, September 25, 2011

New Page Type Release: Visual Layout Page

Rapid Intake has released a beta version of a new page type. This new visual layout page type will allow you to combine media, such as text, video, audio, SWF, and notes, in new and and exciting ways. You can now choose which media elements you would like to use on a page, how many media elements to include, re-size the elements, and where to place each element on the page.

If you would like to learn more about this page type, please check out our wiki:
https://wiki.rapidintake.com/index.php/Working_with_the_Visual_Layout_Page

If you have any feature requests or notice any bugs, please feel free to note it here:

Wednesday, September 21, 2011

More Resources for Rapid Intake Customers

Have you been looking for a quick, but comprehensive guide to one of our eLearning or mLearning course authoring tools? Look no further!

Rapid Intake has released three PDF training guides on mLearning, ProForm, and Unison.

These PDF guides:
  • offer step by step instructions to building, testing, managing issues, and deploying a course
  • include images with the instructions
  • explain settings and options in the authoring tool
Click on the links to view the PDF training guides for the following authoring tools:

Monday, September 19, 2011

Check Out Our Nine New Advanced Interactions!

Ultra, Professional Premium, and Mobile Ultra users can now take advantage of nine new advanced interaction pages.

To see the new advanced interaction pages on an existing course, you must update the style files. To do this, open your course in the authoring tool. Click on the "Edit Course Settings" button at the top of the screen.

Next, click on the course style, then check the box next to "Update Style Files."


Click on "Update Course."


Make sure you clear your cache and you should see the new advanced interaction pages option appear when you add a new page.


You can read a description of each of our new Advanced Interaction pages on this blog post. Additional information on the settings and how to fill out each field is given on our wiki.