Friday, September 30, 2011

Changing Video Size in Unison Courses

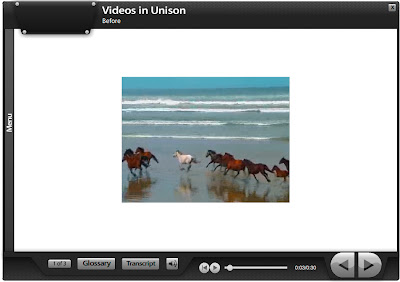
Our customers often notice that videos that are uploaded to Unison courses always appear the same size (and usually not the original size) in courses.


Why?
Unison allows you to upload videos in .flv, .mov, .avi, or .wmv format. All video types (except .flv) must be converted to .flv before they can be used in courses. When this conversion occurs, Unison changes the size of the video to fit in the video page template.

How to Change the Size
By uploading a video that is already the size you want in .flv format, you can bypass the conversion process. This allows you to incorporate a video in it's original size, or you could design a video to take up the entire staging area of the video template.

Here is how:
1. Course Style Size: You will need to look up the staging area dimensions of the course style you are using so you know what size your video needs to be. You can look this up on our wiki. Look up the name of the style you are using for the course. The staging area is the number in parenthesis.

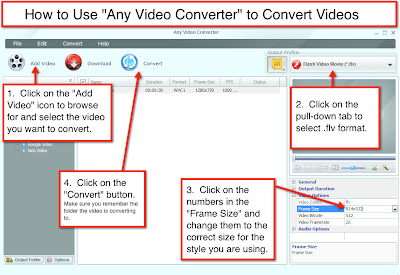
2. Video Size: Now that you know the dimensions for the staging area, you can change your video dimensions to match. You will need to use a video editing tool or converter to change the size. If you don't currently have a tool, you can download a free trial of the "Any Video Converter" here. For steps on how to use "Any Video Converter," see the instructions on the image below.


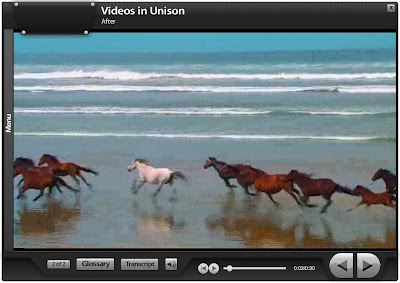
3. Upload to Unison: Now you are ready to upload the video to your Unison Media Manager for use in your course. Since your video is already in .flv format, it won't need to be converted and should take up the entire staging area, like this:


Sunday, September 25, 2011

New Page Type Release: Visual Layout Page

Rapid Intake has released a beta version of a new page type. This new visual layout page type will allow you to combine media, such as text, video, audio, SWF, and notes, in new and and exciting ways. You can now choose which media elements you would like to use on a page, how many media elements to include, re-size the elements, and where to place each element on the page.

If you would like to learn more about this page type, please check out our wiki:
https://wiki.rapidintake.com/index.php/Working_with_the_Visual_Layout_Page

If you have any feature requests or notice any bugs, please feel free to note it here:

Wednesday, September 21, 2011

More Resources for Rapid Intake Customers

Have you been looking for a quick, but comprehensive guide to one of our eLearning or mLearning course authoring tools? Look no further!

Rapid Intake has released three PDF training guides on mLearning, ProForm, and Unison.

These PDF guides:
  • offer step by step instructions to building, testing, managing issues, and deploying a course
  • include images with the instructions
  • explain settings and options in the authoring tool
Click on the links to view the PDF training guides for the following authoring tools:

Monday, September 19, 2011

Check Out Our Nine New Advanced Interactions!

Ultra, Professional Premium, and Mobile Ultra users can now take advantage of nine new advanced interaction pages.

To see the new advanced interaction pages on an existing course, you must update the style files. To do this, open your course in the authoring tool. Click on the "Edit Course Settings" button at the top of the screen.

Next, click on the course style, then check the box next to "Update Style Files."


Click on "Update Course."


Make sure you clear your cache and you should see the new advanced interaction pages option appear when you add a new page.


You can read a description of each of our new Advanced Interaction pages on this blog post. Additional information on the settings and how to fill out each field is given on our wiki.

Sunday, September 18, 2011

New Advanced Interactions for Professional Premium Users

If you are an Ultra, Professional Premium, or Mobile Ultra level user, you can now take advantage of nine new Advanced Interaction page types that have been released for Unison. Descriptions and screen shots of the new page types are given below.

Note: If you currently don't have access to these page types, but would like to, you will need to upgrade to Professional Premium level. Email us at sales@rapidintake.com for any questions regarding your current level or upgrading.

9 New Advanced Interaction Pages
You can read a description about each of our new Advanced Interaction pages on this blog post. Additional information on the settings and how to fill out each field is given on our wiki.

Case Study
The Case Study interaction allows you to present the learner with a scenario and a blank field to type in an essay type response. The scenario can include an image and an audio file. Use the table below to fill out the form according to how you want the page to display.

Categories
In this timed interaction, learners will be given terms to drag and drop in the correct category. You can have up to four categories, with up to eight terms in each.

Concentric Circles
In this interaction, the learner will be able to explore different layers of a circle. Each layer will have a title and a pop-up box with a description will appear when the learner clicks on the layer.

General Matching
In this timed interaction, the learner will match terms to their definitions. After the learner drags the term to the definition, a connecting line will appear that will indicate whether the response is correct or not. A red line indicates an incorrect response. A green line indicates a correct response.

Spin the Wheel
This interaction allows the learner to spin a wheel and answer the questions that appear. There are six categories on the wheel and up to five questions in each category.

After spinning the wheel, the learner will be posed with a question and multiple answers to choose from. The learner will be timed during each question and will have to choose the answer before time runs out. After selecting an answer and submitting, the learner will view a pop-up box with feedback in it. The score will be shown at the top of the screen.

After finishing the game, the learner will be able to view each question, their answer, the correct answer, the feedback, the final score, and the time spent on each question.


Survey

This interaction allows you to ask questions to survey your learners. You have the option of giving your learners a scale of 1-5 or a blank text field to respond to the questions. You can set up the results to be emailed to you.


Venn Diagram

This interaction allows you to show the similarities and differences between two or three different categories or items.


Word Game Non-Timed
This interaction allows you to ask your learner a series of questions and have your learner type in a response into a field. You have up to eight questions and can give feedback on each question.

Word Game Timed
This timed interaction allows you to ask your learner a series of questions and have your learner type in a response into a field. You have up to eight questions and can enter in a time limit and a point value for each question.

Wednesday, September 14, 2011

Resizing Your Course

Have you or your learners noticed that often times the course does not take up the entire screen? Are you tired of seeing extra white space around the course?

White Space Before:


Full Screen After:
You can easily stretch your course to full-screen by making simple changes to one of the course files.

How?
  1. The course first has to be finished and deployed. Locate the zipped file on your computer of the course you would like to make full screen.

  2. Unzip the file.

  3. Open the course folder and look for the file called "ie_activecontent_fix.js"

  4. Open the file in a text editor, like Notepad++ or Textmate (not Microsoft Word). Locate the dimensions for width and height. Your course will look similar to the example below:

  5. Change the width and the height in both places to "100%." Make sure you only delete the numbers in the quotation marks, not anything else.

  6. Save the changes you have made, zip up the course, and you are ready to publish the course to your LMS!
Note: In some cases making adjustments to a course size will cause pixelization of page images. Most courses will adapt without problem, but some courses will reveal pixelated images on large monitors.