Wednesday, March 23, 2011

Uploading your course to ClickCourse

One of the most important aspects of ClickCourse LMS is uploading your courses so that learners can take the courses assigned to them. In this tutorial you will be walked through the steps of how to upload a course and activate it.


Step 1: Log in to ClickCourse


Step 2: Click on ‘Administrator Functions’


Step 3: Click on ‘Manage courses’


Step 4: Click on ‘Upload SCORM Package’


Step 5: Click the browse to the right of ‘Select SCORM Package To Upload’ and begin to browse for you course.


Step 6: Once you have found the zip of your course, select it and click ‘Open’


Step 7: Click on 'Upload' and wait for the course to be uploaded to the LMS. Once it has been uploaded you will see the following screen asking for you to set a Course Name and Course Description. Fill these in as you would like, and click on 'Activate Course'.


Step 8: Click on 'Course Options'.


Step 9: Check the box under the Select column and then click on 'Assign Course' below.


Step 10: When assigning the course you will have a few different options. First, you can select the option to have a course be automatically assigned when a user registers for the LMS. Then you will have options on who this course is going to be assigned to. If you select 'All registered learners', then the course will be assigned to all users within the group they are assigned to. Selecting 'one or more registered learners' will allow you to assign this course to individual users which don’t have to be directly associated with the group you are in. Lastly, you can choose to make this course mandatory or optional. For this tutorial we will select 'one or more registered learners'.


Step 11: Type in the username of the user you are wanting to assign this course to, or click 'search' with a blank field in order to view a list of all registered learners.


Step 12: Check the box for the learner(s) you want to assign the course to and click 'Assign Course'. Now the course will be assigned to those users and they will see it under the My Courses link on the default menu of ClickCourse.

Feel free leave your comments below or email our support team at support@rapidintake.com.

Thursday, March 17, 2011

Building an interactive definitions page: Using the Unison definitions page

Common to most online courses, you may need to have the learner review terms and definitions. Luckily the definitions page in Unison is easy to use. In this tutorial I will walk you through the steps for building a definitions page.

Step 1: Open your course or start a new one

The first step is to open a course you want to create the link in or start a new course. Go into the "Build/Modify" area of the course.

Step 2: Add a definitions page

Once you have your project up, next you want to add a definitions page to your course. You can place this page anywhere you want in the course. My example course will just have one page for now.

The definitions template is in the "Other" category when you are adding a new page. Once you are in that category you will see the "Definition" page.


After you have selected the image click on "Add Selected Label"

Step 3: Input your content
At this point we'll want to input the content simply by completing each step within the template. Step 1 in the form is as simple as any other page in Unison, you just need to enter in a title for your page.

Step 4: Instructions

The next step in the page template (Step 2) is the area for the instructions. There are two sets of instructions, one is for the learner when they are learning the interactions. This is the first area that the end user sees so this usually is something like "Roll over the terms to learn". We have already filled out some default text for you, you can simply leave it or change it to whatever you want.

If you scroll down from there you can see the other set of instructions for the learner when they are reviewing the terms. "Review the terms" is kind of a test for the learner to see if they remember which term matches up with the appropriate definition. This is a drag and drop exercise for the learner. Just like the previous instructions, we have already typed in some default instructions, you can modify that or change it to your own.

Step 5: Adding your terms

Going on to the next step in the form (Step 3), this is where you add your terms and definitions. With the terms and definitions page you can add up to seven terms and definitions. You do not need to use all of them so only enter the amount you want to use for this page.

It is as simple as filling out the text field for the term and then for the matching definition.

After you are done with this you can go onto the next step.

Step 6: Adjusting the colors

The next step in the form is the color settings (Step 4). In this part you have three color sections. The first section is the terms color.

You have two settings, one is the terms color. This is the color of the terms before you roll over them during the learning phase. It is also the color of the term during the reviewing phase.

Term when learning:

Term when reviewing:

As you can see in these two different states it is the same color. The next part is the roll over color for these terms. This color is only when learning the terms and not when reviewing the terms.
You can leave the default color or change it to whatever color you want.

The next section in the color settings is the color of the terms. You can see you can change the color of the text here.
The last section in the color settings is the button colors. You can change the color of the buttons of both the standard color and the roll-over color.
Step 7: Preview your course

Once you have built your course, the next step is to preview and publish! Hopefully after this tutorial you will be able to easily set up an interactive definitions page for your learners.

Feel free leave your comments below or email our support team at support@rapidintake.com.

Friday, March 11, 2011

Saving a course template in Unison

Often people building courses may have similar content that they use in one course that they would like to use in another course. Some examples may be a standard introduction, a pool of questions in a quiz, a glossary, or other similar pages. Having to create these pages again and again can feel like such a waste of time. There has to be an easier way, and luckily this blog post will show you that there is!

Step 1: Thinking of what content is going to be re-used in multiple different courses

When creating templates in Unison, the best thing to do is to think of what pages are you going to be using over and over again. This could be things like an intro page that will be the same in every project, maybe the same course style that you want to use for every course or maybe you have the same pool of questions that you want used in your courses but just have them pulled in a random order.

I suggest that you first plan out and think of what you want in your courses that will be the same across the board. Even if you start from a template you can tweak content for each course as well without messing up the template so don't worry about that.

Got your content in mind? Good, for me I will just have a simple intro page and quiz page with a couple of questions.

Step 2: Create a new course
Start by creating a new course in Unison. Keep in mind that this will be your template so you do not want to create a full and detailed course, but just a course that will be your starting template for other courses. If needed you can tweak this template later so new courses you start can have the new changes.

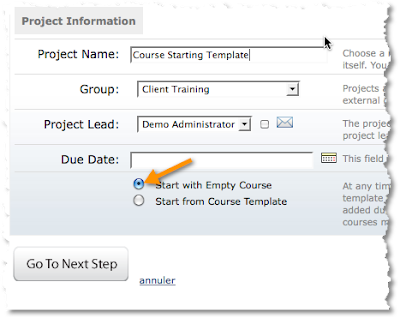
In this case I am starting a course called "Course Starting Template". Since we have not saved any template yet I want to make sure "Start with Empty Course" is selected instead of "Start from Course Template". Once we have saved our template we will start other courses with the "Start from Course Template" option, for now we are just setting up our template.


Go onto the next step to pick your course style. Here is where you can pick the style of your course. The nice thing about setting up a course template is you can pick the style and every other time you start from this template that style will already be chosen. That way you can make sure if other people are starting courses that you are all creating a universal look and feel for all your courses.

For now I am just going to choose the "Deep Black" course style. The next step is to assign other people to this course. You can if you want but for now I am going to leave myself assigned and then go onto "Create My Project"

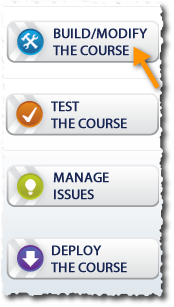
Once your project is created click on "Build/Modify the Course" to launch the course authoring tool.

Once you have the course authoring tool launched, let's go ahead and go onto the next step.

Step 3: Building your re-usable pages

Keep in mind here that we are not building a course with this project, we are going to be building pages that will be re-used for other courses. So, just build the pages that you will use often in other courses. Keep in mind that when you start another course you can always delete the pages that do not apply for that particular course so go ahead and add any pages that may be used for more than one course.

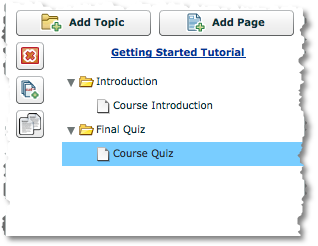
I am going to build a text page for my intro since I will always have the same intro to my courses and a quiz page with some questions in it which I will set up to be pool of questions that will be randomly asked. Go ahead and build whatever pages you want. Keep in mind that the page names can be tweaked in each course, so for the template just keep it general.


Now that you have your pages built we are ready to save this course as a template. Keep in mind that you just need to build the pages that will be used in other courses as well.

Step 4: Save your course as a template

Now is where the magic happens. Up on the top of your authoring tool there is a button that looks like this.

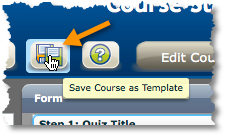
By selecting this option you will have the chance to save your course as a template. Once that button is clicked on you will be presented with this dialogue.

You want to make sure you name this template. This is the name that you will see when you start new courses. So give your template a name, I will be naming it "Course Starter" then select the "Name This Template" button.

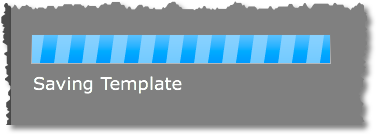
It will then save your template. It may take a few minutes depending on the size of your template.

Once it is done saving you will see a yellow message at the top that says "Template Saved". Once that is done, do not start building a course in this template. You want to save this course just for tweaking your template and not for building an actual course. So close out of this course and go ahead and start a new project.

Step 5: Starting from a template

Now that you have your template set up, you can start any new course from that template. First start a new course:

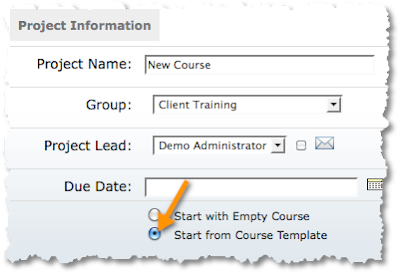
This time you want to make sure "Start from Course Template" is selected instead of "Start with Empty Course". Then select "Go To Next Step".

The next step will then take you to the list of course templates you have saved. Select the one you wish to start from and click on "Create My Project". Assign the people to your project and click on "Create My Project" again.

Once your project is created click on "Build/Modify" to launch the course authoring tool.

Now that you have the authoring tool up you will notice your pages already created for this course and that they are currently identical to your template.

The nice thing is you can start tweaking text, images, adding pages, deleting pages that don't apply for this course and this will not change your template.

This will help speed up development by allowing you to bypass creating the same pages for each course you develop.

Hopefully this tutorial will help you create your own templates and make your authoring process faster and easier. If you have questions or need additional info please leave your comments below or email us at support@rapidintake.com.

Thursday, March 10, 2011

Using your own logo with ProForm courses

One question that gets asked a lot is "How do I add in my own logo to ProForm courses?". Although it may seem tricky at first, it is actually easy to do once you know how. In this blog post I will teach you the steps to apply your own logo to any ProForm course.

Step 1: Open a current project or start a new one

The first step would be to make sure you start a new course or go into one you have already started. Once you have your project started you need to navigate to your project folder. Your project folder is the location on your desktop where you saved your project. Each course has its own folder.

If you cannot remember where you saved your project folder you can always check by clicking on your project settings and looking at the project folder path as shown in this screen shot.

In my case I have saved my project folder on my desktop. So I need to navigate to that folder on my desktop. Once you have located the appropriate folder, open up that folder with your windows finder as seen here.

Here is where you will find all of your project files.

Step 2: Locate the current course logo
By default, every course that gets created has a default course logo. This logo is the course_logo.swf file. If you were to just double click on that file you would see that it just just a Flash file that has a Rapid Intake logo inside of it. As seen here:

That file gets placed into your course style. You have two options. You can either just delete that file and have no course logo or you can create your own course logo in two different ways. The next step will be split into A and B options to show you the two different ways you can get a course logo ready to be used in your courses.

Step 3A: Getting your own course logo ready

The first option would be to use your own jpg image. You need to first of all delete the current course_logo.swf file. Once you have done that you can now get your own jpeg ready to be used as the course logo.

Size:

The size of the course logo depends on the course style that you may be using. The best way that I have found to get the size is to measure the old course logo that was in there before you delete it. There are many different measuring tools out there like Snag It or other tools that will do this for you. Once you have determined the size of the old logo you can use that as a target for your logo size. Most logos are around the 164x63 pixels size. You may need to tweak here and there.

At this point you would save your logo as a .jpg file. If you need an image authoring tool you can download a great free one called GIMP. When you are ready to save your image as a .jpg you'll wan save it named as "course_logo.jpg". (If you have already saved your image previously you'll want to now rename it.)

ProForm courses look for either a file called "course_logo.swf" (which is the file we already deleted) or if it cannot find that it will look for a .jpg image called "course_logo.jpg". Once it finds that image it will then use that as the course logo.

Now that you've saved your image under the proper name, simply take your image and drag and drop it into your project folder.

After you have moved it over to the project folder, go ahead and preview your course and you should see the logo appear in your course. If you are still seeing the old logo make sure you have deleted the course_logo.swf file.

Step 3B: Using a SWF file as your logo

So the question is, if the above method works just fine why would I even need to read this step? Truth is you don't need to read this step if you are happy with the way your .jpg logo looks in your course. However, some of you may notice that when using a .jpg that your logo can only be on a white background, which may be problematic if your logo normally has a transparent background. .jpg files cannot support transparency so you are sometimes stuck with that white background, which in some cases may look just fine but not always. Personally, it drives me nuts to see the white background when the rest of the style may be a color like black or blue.

That is why I like this other option. This option is to create a SWF file. A SWF file is a Flash animation file. However, many programs can save images into SWF files without even using Flash or even having Flash.

One of those tools is our very own called SWiSH. SWiSH is a great, inexpensive tool that will not only help you animate but in this case help you create a transparent logo. You can just bring in your PNG file into SWiSH and save it as an SWF file. Name it "course_logo.swf" when you save it and drag and drop it into the same location as your project and it will show up in your course as a transparent .swf file.

Again, you could also just use something else like Flash or Illustrator to save your image as a SWF if you are familiar with those programs.

Hopefully the above tips have enabled you to upload your own logo into ProForm. If you need any other help, please comment below or email our support at support@rapidintake.com.

Linking to other pages in your Unison course

One of the nice features of Unison is you can link to any other pages within your course. This allows you to take a linear course and make more dimensional, therefore allowing the user to decide on the path they take.

In this short sample I will show you how to make a text link to another page within the same course.

Step 1: Open your course or start a new one.

The first step is to open a course you want to create the link in or start a new course. Go into the "Build/Modify" area of the course.

Step 2: Create a link within your text

Within a text field you now need to create the text link. You'll want to use descriptive text to explain what action the link will perform. For example, if you want the user to go to another page within the course you can use the text, "Click here to read more about this subject". Then make the "Click here" the click-able part of the hyperlink.

In this example I am going to use the text "Click here to go to another page" making the "Click here" the click-able part of the link. To do that in Unison I just type in the phrase then simply highlight the "Click here" part of the text.

As soon as I highlight the part of the text you will notice a text field below the text editor that will activate showing "http;//".


If you were linking to another website you could just type in the URL here. However we need to link to another page with in the same course so for now just delete the "http://" from that text field.

Step 3: Using the code to go to another page

After you have deleted the "http://" you now need to enter in a short piece of code that will tell Unison that this needs to go to another page with the course. Here is that code

asfunction:goToPage,(enter page name here)

Let's explain what we are doing here.

asfunction:

This part of the line tells Unison to run an ActionScript code. ActionScript is the coding language for Flash. So by placing this inside this line we are telling the course player to run an actionscript command. You don't need to fully understand how it works, but in this case linking to another page requires that we type it in.

goToPage,

This text tells ActionScript what to do. In this case we are saying "Hey course, when someone clicks on this link I want you to go to this page." This text does have to be entered exactly as it is written above, with the capitals in the right place and the comma right after "Page".

(enter page name here)

I did not bold that in the example because the page name is whatever name you want to link to. In the image I am linking to a page name called "Page 2". Always type in the page name right after the comma there cannot be any space between the comma and the page name, and do not include any parentheses- these were simply used to signify that you enter your own page title at this point in creating the link. If your page name has spaces between the words that is fine but the first word needs to be right after the comma. See the screen shot above for an example of how the text should look to create the link.

You can find the name of your page from the list on step 1 of every page template. It is the title of the page.

Step 4: Preview your course

After you have set up your link, that is it! Test it out and see if it is working. If it is not working then go back and make sure you have typed in the code correctly.

Link IDs

If you have two pages in your course with the same name you can use what are called "link IDs" instead of page names. This field can be found in every page template in Unison under the Advanced tab, which is usually the last step in setting up the template. Again, you only use this if you have two pages with the same name. One example of this would be if you have an intro page for every topic titled "Introduction". In the linking process if you just typed in "asfunction:goToPage,Introduction" then it would not know which intro page to go to.

Instead, you can assign a Link ID to each page which is not visible to the learner but helps you when linking to that page.


Going back to the intro example, I would give my first first page a Link ID of intro1 and my second intro page of intro2, then in my simple line of code if I want to link to the second intro I just type "asfunction:goToPage,intro2" and it will link to that page instead of the other page.

Hopefully this post will help you create dynamic courses that are effective and simple for your learners. If you have any questions or need any help with this please type in your comments below or you can email our support at support@rapidintake.com.

Attaching External Files to Your ProForm Courses

When creating eLearning courses you may often want to attach external files to your course pages. For example, you may want the user to reference a PDF or download a PowerPoint for later reference or use.

Rapid Intake ProForm now makes it extremely easy to attach external files such as:
- PDFs
- PowerPoints
- Word Docs
- Excel Docs
- Zip files
- Another other type of file

This means you can create a link that when clicked on the user will download to their desktop any attached file. Here are some steps on how to do this with your Rapid Intake ProForm software.

Step 1: Open an project or create a new one.


The first step is to open a current project or start a new project inside of ProForm. Now you can create a text link in any text editor area inside of ProForm.

In this example I have just created a basic text page but you can do this with any page that has text.

Step 2: Creating the text for the link

Once you have added the text page or any other page that has the text field area, you can now set up your link. Usually when creating a link you want to have text such as "Click Here" or "Download the PDF". Type your chosen phrase inside the text field.

After you have typed in your text, select the part of the text that you want to be the hyperlink and then cli the hyperlink button as indicated in the picture below.

Step 3: Creating the link

After you have selected the part of the text that you want to be the link and the selected the hyperlink button you will be presented with the URL input prompt. Usually this is where you would type in the path to some website that you want to link to. But in this case we are not pointing to some external website. We want to point to an external file that we are storing within our course.

All we need to do here is type in the name of the file we want to pop up for the learner. Now, the name has to be exact or else it won't work. It is good habit to copy and paste the name as well to make sure you got the name exact.

One important thing to notice in the above screen shot- you will see that you also have to type in the extension of the file. The extension depends on what type of file you are linking to. In my case I am linking to a PDF so I need to type in ".pdf" after the name of my PDF. If I were linking to a Word document I would need to type in ".doc" after the name of my Word document. The same goes with any type of file you are linking to.

Also keep in mind that if you are linking to an external file the user's computer has to be able to support that file. If you are trying to use an Excel file and the end user does not have Excel or any other program that opens Excel then they will not be able to see the attachment.

You do not need to select anything in the target field, so from here just go ahead and select "ok". You will see now in your text field that the part of the text that you highlighted is blue. You can change this if you wish to a different color but the default color usually is blue. If you are using a custom style your CSS could be changed to a different color as well for your hyperlinks.

Step 4: Getting your files in the right location

We have created the link, but if we were to preview the course right now it would not work. Why not? Well, essentially what we have done is here is said to ProForm that when the user clicks on this link, look in your project folder for a file called "Sample.pdf" and pop it up for the user to see.

Ok so the logic is there but we have right now the Sample.pdf, which in my case is not in my project folder. I need to drag and drop my sample PDF into my project folder.

Where is your project folder? It depends on where you saved it when you first created your project. In my case if I go back to my project settings by clicking on the project settings button up at the top of ProForm, I can see the path of my project where it says "Project Folder"

Ok, now that you know where your project folder is on your desktop you now need to open up a window to that project folder. You can see from the image below that I have pulled up my project folder in a finder window.

Now all you need to do is drag and drop your file into this location.


Once that is in the project folder you can now go back to ProForm and preview your project. When your have your preview up, try clicking on the link and watch your PDF or other files pop open.

Things to keep in mind

If you are going to have a lot of files that you link to you may want to organize your files a little more rather than just placing them in the main directory of the course. You can create a folder inside of the main directory and place all your attachments there. If you do that you will have to update your links or type in the path for new links to that folder.

Before, all we had to type into the URL area was "Sample.pdf", but if in my main project directory I created a folder called "attachments" and I placed my Sample.pdf into that folder I need to let ProForm know that it is now within that folder. So my new path in the URL text field should now look like this "attachments/Sample.pdf".

Tell us what you think about this post, if you have any questions or comments feel free to ask them here or email our support team at support@rapidintake.com.

Here is a short video with no audio showing the steps I took to create this hyperlink.