Thursday, February 16, 2012

5 Strategies for Rapid eLearning Development - Strategy #1 Don't Build Courses - Design Programs

I live in what is called a "master planned community" meaning a team designed our community architecture, layout, streets, parks and amenities...down to the last detail. We all have very similar houses, mailboxes, fencing, and color scheme. ...
As eLearning professionals we want the same thing. A high quality product, built on time that meets the need of our learners and budget.

Monday, January 16, 2012

Rapid Intake's New Community

NEW Website
The Rapid Intake website has undergone some changes recently.  Next time you visit our website, you will notice an attractive new interface, faster navigation, simplified menus and tabs, and a new community.  We have also moved our blog to the new community, so look for new updates there!


NEW Community
Our new community offers easy access to:  
  • Groups and forums to communicate and interact with other members of the community and Rapid Intake professionals
  • Video tutorials
  • Our support blog
  • Self-paced training materials
  • Our Marketplace
  • Live chat support and email
  • and more!

Becoming a Member
Although becoming a member of the community is not necessary to access the videos, blog, training materials, or market place, creating an account will give you access to even more resources.  Signing up for an account is free and allows you to post to the forum and join groups.  

Friday, January 13, 2012

How to Delete a Project

You must have an account level of "Administrator" to be able to delete projects. Here are the steps to deleting a project:
  1. After logging into the authoring tool, you will click on the "Admin" tab.
  2. Look for the heading "Projects" and click on the link "View/Update Projects."
  3. You will see a list of all your projects. Locate the name of the project you want to delete. Click on the "delete project" link to the left of the project name.
  4. You will see a pop-up box that asks if you are sure you want to delete the project. Click "OK."
Warning: Deleting projects cannot be undone. If you delete a project you will not be able to revert to previously saved backups. The project will be unrecoverable.
An alternative to deleting a project would be to archive it. Read this blog post to learn more about how to archive projects.

Tuesday, December 20, 2011

Changes to Mobile Video Conversion

Our Media Manager has been updated to provide a way for you to upload MP4 videos for mobile course use without having to go through the conversion process.  Customers have requested that we provide this feature because they find that videos that go through the conversion process can change in regard to quality and size.

How It Works
Next time you open up your media manager to upload a video to use in your course, you will see this check box on the screen:  "Keep MP4 in Original Format."

If you don't want your video to be converted, simply check this box after browsing for and selecting the video you want to use.   If this box is checked when you press "Upload Files," your video will not go through the conversion process and will maintain the original size and quality.

Warning
If you keep the MP4 video in the original format, it may not have the appropriate codec to be compatible with all mobile devices. The best practice, to ensure that the video will be compatible with as many mobile devices as possible, is to allow the media manager to convert it. Even videos that are originally in MP4 format should be converted in the media manager to make sure that it they get the necessary codec to be compatible with all mobile devices.

How Do I Know if I Can Use this Feature?
If you know your learners are using a certain mobile device, and you create an MP4 video with a codec  specific for that device, you should be able to use this feature without any problems.

If you aren't sure what device your learners will be using to access the course, if your learners will be using multiple devices, or you are using videos that are not in MP4 format, the best practice is to allow the media manager to convert it.


More Information
For more information on video formatting on mobile devices, please refer to these links:
Android media formats documentation:

Apple movie player documentation:

Apple audio documentation:

iLounge article about ipod/iphone video conversion:

Wikipedia article about mpeg-4 part 14:

Thursday, December 1, 2011

Improved Video Conversion

We have improved video conversion to enhance the videos you upload to your flash courses.  Nothing has changed about the way you upload videos, but here are a few of the benefits you will notice next time you upload and convert a video:
  • Increased quality and resolution
  • Improved audio/video syncing
  • Resolved video skewing issues


Tuesday, November 29, 2011

New Stock Images Available

New Stock Media Images in Media Manager
Next time you open your Media Manager, you will notice a new category called "Stock Media."

A wide range of "clip art" images are available for your use, including:
  • Professional people in a variety of poses.
  • Thought and speech bubbles
  • Office type clipart
  • and more!
There are some default stock images that are available to all account levels in Unison and mLearning Studio.  However, if you  notice that there are stock images in your media manager that have a watermark, that means that the stock image belongs to a more advanced level.  To be able to use that image without the watermark, you would have to upgrade to a different level.   If you are interested in purchasing a more advanced level, please contact our sales team: sales@rapidintake.com

Here is an example of one of the stock media images:

Incorporating PNG Files in a Course

Customers asked for a way to be able to incorporate images with a transparent background into Unison and mLearning Studio. We are now happy to announce that both tools now support PNG image files! This gives you a way to incorporate PNG images with a transparent background into your course (either for logos or for images that appear in the course pages).

How to Upload PNG Files to the Media Manager.  
1. Open your Media Manager.


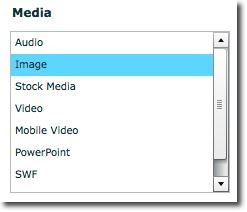
2. Click on the "image" category

3. Hit "Upload New Image."

4. Browse for the PNG file on your computer, select it, and upload.

5. IMPORTANT: Uncheck the "convert png's to jpg" check box. If you want this file to stay a PNG and maintain the transparency, you need to uncheck this box.

6. Hit "Upload Files." The PNG file will now appear in your media manager.

NOTE: Flash Player 7 does not support PNG images. Any Unison course that is labeled a Player 7 style will not support PNG images. If you are working on an existing course that is Player 7, you will need to change it by editing the course settings.

Am I using Player 7?
If you are currently working on an existing course, you will need to check and see if it is a Player 7 style. Follow these steps:
1. Open the course in the authoring tool.
2. Click on the "Edit Course Settings" button at the top of the screen

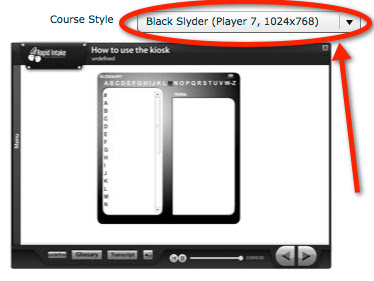
3. Go to Step 2: Course Style. Look in the "Course Style" field to see if the style is labeled Player 7 or 8. The style in the image below is labeled a Player 7 style. This Player 7 style will not support PNG images.

How do I change the course style?
If your current course is a Player 7 style, and you want to change it, you can do so in the authoring tool after clicking on the "Edit Course Settings" button
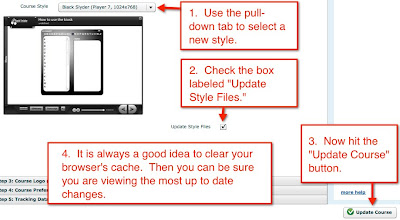
1. Go to Step 2: Course Style. Use the pull-down tab to select a new style.
2. Check the box labeled "Update Style Files."
3. Hit the "Update Course" button at the bottom right of the screen.
4. Make sure that you clear your cache.