Friday, August 26, 2011

Updates to PowerPoint Converter

We noticed that with our previous PowerPoint converter there was no way to completely disable the click when the presentation played in a Unison course. If a learner clicked anywhere on the slide during the presentation, the animations would all advance and the audio would skip or loop.

The PowerPoint converter has been updated to completely disable the click for the learner during the presentation in the course, which will keep the animations and audio from malfunctioning.

What settings should I use when I create new PowerPoint presentations?
Now that the click is disabled for learners during the presentation, you will need to make sure that all your animations and audio files are set to play automatically in your original PowerPoint.

Animation Settings: Set all animations to either "Play with Previous" or "Play After Previous."

Audio Settings: Set all audio files to play "Automatically."

What about the PowerPoints I uploaded and converted previously?
If you have older presentations in Unison courses that were uploaded and converted prior to August 25, 2011, and you want take advantage of the new click disabled setting, you will need to delete the old presentations from your media manager and re-upload the original PowerPoint presentation to Unison. Re-uploading it with the new converter will ensure that the click is disabled during the presentation. If you need a reminder on how to upload a PowerPoint Presentation, please read this blog post.


Thursday, August 25, 2011

Issue Management: Grid vs. Row View


The newest release of Unison provides a new way of viewing the issues that you are managing in your course. To manage the issues for a course and witness the new views for yourself, log in to Unison, click on one of your projects, go to "Manage Issues" and you will see these two icons to the right above the list of your issues:

This blog post will discuss the advantages of viewing the issues in "Grid" format. For more information on the features of the newest Unison release please read this blog post.


Advantages of Grid View

Using the “Grid” allows you to see a lot more information about the issue and to sort the issues in different ways.

When you first enter the “Grid” view, you may have a hard time seeing all the data because there are many narrow columns.


Widening the Columns

If you can’t read all the information in a column, just hover over the edge of the column until you see the symbol with the lines and arrows. This will allow you to click and pull the edge of the column over to make it wider.


Viewing Less (or More) Columns

Still overwhelmed by the amount of information you are looking at? You can go in and take away some of the columns from the view screen. This will make the remaining columns wider and easier to read.

1. Hover over a column heading until it turns blue and you see an arrow on the right side.

2. Click on the arrow to pull down the menu, then hover over the word “Columns.” You will see a list of all the column headings next to check boxes.

3. Click on a box to uncheck it. This column will now be removed from your view.


Sorting Column Information

You can now sort the information in each column by hovering over the column, clicking on the downward arrow, and clicking on “Sort Ascending” or “Sort Descending.”

Sorting the information in the “page” column will allow you view issues grouped by page. For example, all issues on page 1 will be grouped together, so you can go in and make all the necessary edits to page 1 that are necessary at the same time. Sorting the information in the “Priority” column will group the issues by priority. You can then go and start working on the group of issues at the highest priority first.

Important New Features for Unison Users


We have updated Unison to include the following new features:

  • Enhanced Issue Tracking: We have upgraded the issue management system to include a color indicator on the "My Projects" tab, making it quick and easy to identify how many open, verify, and closed issues you have been assigned. There are now two ways to view the issues, and even a way to make an issue "private."
  • Customized Reminders: Administrators now have the ability to email customized reminders to team members.
You can read more about these new features below:

Enhanced Issue Tracking
Assigned Issues
When you open the "My Projects" tab, you will now be able to just glance at the issue color indicator to see how many open, verify, and closed tickets have been assigned to you on each project.


Viewing the Issues
If you want to view the complete list of all issues, click on the light bulb icon. If you want to view only the open issues, click on the number in red on the color indicator. If you want to view issues that need to be verified, click on the number in yellow on the color indicator. If you need to view issues that have been closed, click on the number in green on the color indicator.

There are also two ways to view the issues. Once you have clicked on the issues (either the light bulb icon or from the color indicator), you can change the way you view the list of issues by clicking on the row or grid icons.


View as Row

View as Grid


To read more information about the advantages of viewing the issues in grid form, please click the link to read the "Grid vs Row" blog post.

And, as always, you can click on the "Download Excel" link to down load the list of issues as an Excel spreadsheet.

Making Issues Private
You can make new and existing issues private (hidden from reviewers) by going to the "Manage Issues" link under the "Authoring" tab. Click on "Add a New Issue" (or click on edit for an existing issue) and check the box next to "Private Note" under the issue text field.


Adding Customized Reminders
To send a customized reminder for an existing course, click on the "Admin" tab and then click on the "View/Update Project" Link.

Locate the project and then click on the project name. You will now be able to view the "Project Information" and "Optional" expanding menu (as illustrated in the image to the left.

Make sure that your project has a due date, and then select the team members to whom you want to send an email reminder, select the day, and type in a personalized reminder message. Your team members will receive this reminder by email.

Wednesday, August 17, 2011

Using SoftSkills Pages in ProForm

Incorporating SoftSkills pages into your ProForm course is a great way to give your learners a chance to practice their skills in a simulation.

How It Works
Learners will be faced with a scenario, often with accompanying images and audio, and have to make a decision based on the options they are given. The choices that learners make will award (or deduct) points from their score and result in different subsequent scenarios and conclusions. At the end of simulation, learners can view all the choices that they made and receive feedback on each, as well as seeing the points earned for each choice and their final score.

What You Need
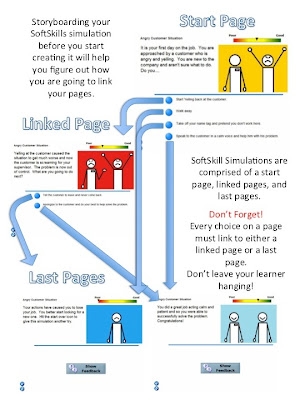
The SoftSkills pages run similarly to a choose-your-own-adventure book, with a scenario on each page and choices that follow and take the learner to new pages. Setting up the SoftSkills pages correctly means that the choices on each page link to another page and that each choice eventually leads to a conclusion. Every SoftSkills simulation must include the following pages:
  • Start Page: Every simulation will have ONE of these pages. There are up to four choices on the start page that will link the learner to additional pages.
  • Linked Pages: The amount of "linked pages" in your simulation depends on you! This is the page type that each of the four choices from the start page will go to. Every choice must lead to a "linked page" or a "last page."
  • Last Pages: Any time you wish to put an end to a string of choices, a "last page" must be used. This page type will end the simulation, give the learner feedback, and allow the learner to continue on to the rest of the course.
The image below is an example of a start page.
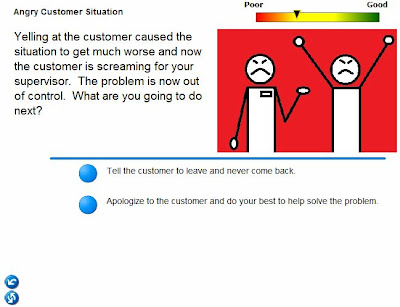
The image below is an example of a linked page. There are only two choices on this page, but you can have up to four.
The image below is an example of a last page.

All three of these page types ("start page," "linked page," and "last page") are built off the basic SoftSkills page, but you must change the settings in a very specific way for each one. The required settings for each page type is given below:
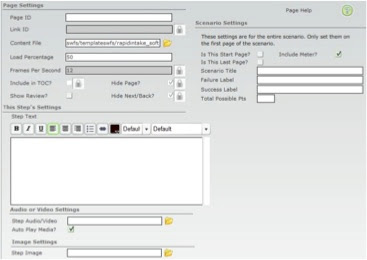
Start Page
Page ID: Type in the name of the page. This is the name that will appear in the table of contents.

Link ID: Optional. If another page links to this page, you will need to enter a link ID.

Content File: Do not change.

Load Percentage: 20

Frames per second: 12

Include in TOC?: Check this box. First click the lock, then click the box and click the lock again. This will ensure that your first page appears in the table of contents.

Show Review?: Leave this unchecked.

Hide Page?: Uncheck this box. Click the lock to open the field, click the box to uncheck it, then click the lock. This will ensure that the page is not hidden from the learner.

Hide Next/Back?: Check this box. By hiding the next and back keys, our learner won’t be able to skip over the simulation.

Step Text: Type in the text that you want the learner to read to start the scenario.

Step Audio/video: Optional. Click on the folder icon to browse for the file you want to use.

Step Image: Optional. Click on the folder icon to browse for the file you want to use.

Is This Start Page: Check this box since it is the first page of your simulation.

Is This Last Page: Leave this box unchecked.

Include Meter?: Check this box if you want your learner to see the meter that rates their responses.

Scenario Title: Type in the text that you want to appear as the heading at the top of the page during the simulation.

Failure Label: This is the text that appears on the negative side of the meter. Ex. Poor/bad

Success Label: This is the text that appears on the positive side of the meter. Ex. Great/Well Done

Total Possible Pts: The total points maximum that the learner can earn during the simulation.


Choice Tabs on the Start Page

Each of the choices from these tabs will appear on the scenario start page, immediately below the step text.

Choice n Text: The text the learner will read for this choice.

Choice n Audio: Optional. Click on the folder icon to browse for an audio file.

Choice n Point Value: Assign this choice a point value.

Choice Links To: Type in the Page ID of the "linked page" that this choice will take the learner to.

Choice n Feedback: This feedback will be received by the learner after the simulation has ended.
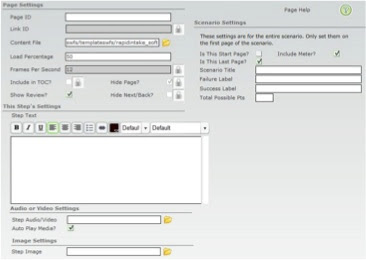

Linked Pages

Page ID: This Page ID needs to be typed in on the corresponding choice tab that leads to this page.

Link ID: Optional.

Content File: Do not change.

Load Percentage: 50

Frames per second: 12

Include in TOC?: Uncheck this box.

Show Review?: Uncheck this box.

Hide Page?: Check this box. This will ensure that the page does not appear in the table of contents.

Hide Next/Back?: Check this box.

Step Text: Type in the text that you want the learner to read.

Step Audio/video: Optional. Click on the folder icon to browse for the file you want to use.

Step Image: Optional. Click on the folder icon to browse for the file you want to use.

Is This Start Page: Uncheck this box since it is not the first page of your simulation.

Is This Last Page: Uncheck this box since it is not the last page of your simulation.

Include Meter?: Check this box if you want your learner to see the meter that rates their responses.

Scenario Title: Leave blank.

Failure Label: Leave blank.

Success Label: Leave blank.

Total Possible Pts: Leave blank.

Choice 1-4 Tabs: Fill out up to four choice tabs that will lead your learner to even more pages.


Last Pages

Page ID: This Page ID needs to be typed in on the corresponding choice tab that leads to this page.

Link ID: Optional.

Content File: Do not change.

Load Percentage: 50

Frames per second: 12

Include in TOC?: Uncheck this box.

Show Review?: Check this box. At this point the learner will receive a score and feedback for all the choices made during the simulation.

Hide Page?: Check this box. This will ensure that the page does not appear in the table of contents.

Hide Next/Back?: Uncheck this box. After completing the simulation, the learner will will click on the “Next” button to take them to the next part of the course.

Step Text: Type in the text that you want the learner to read.

Step Audio/video: Optional. Click on the folder icon to browse for the file you want to use.

Step Image: Optional. Click on the folder icon to browse for the file you want to use.

Is This Start Page: Uncheck this box since it is not the first page of your simulation.

Is This Last Page: Check this box since it is not the last page of your simulation.

Include Meter?: Check this box if you want your learner to see the meter that rates their responses.

Scenario Title: Leave blank.

Failure Label: Leave blank.

Success Label: Leave blank.

Total Possible Pts: Leave blank.

Choice1-4 Tabs: Leave blank.


Your simulation is now complete!


Monday, July 18, 2011

Nominate Rapid Intake Tools for Best of Elearning!

The time has come for the
7th Annual Best of Elearning! Awards

WHAT? The Best of Elearning! Awards is a reader’s choice awards program for e-learning products and services. The 2011 ballot features many different categories, but this year we are inviting our customers to nominate Unison and mLearning Studio for the "Best Rapid Development Tool" and the "Best Mobile Learning Solution."

HOW? It is so easy!
  1. All you have to do is click on the link to go to the Best of Elearning! 2011 Ballot.
  2. Scroll down until you get down to category #10. Best Rapid Development Tool and #17. Best Mobile Learning Solution.
  3. Type in "Rapid Intake" for the company field and "Unison" or "mLearning Studio" for the product, depending on which you use. Type in what it is that you like most about the products. This may include: collaborative development, Flash and/or HTML5 publishing without having programming experience with either one, integrated REVIEW features, and the selection of content (learning games, quizzes, tests and more).
  4. Scroll down to the very bottom and fill in the Ballot Validation information (Customer name, company name, etc.) and click on "Submit."
WHEN? Ballots are accepted NOW and until August 1st.

Thank you for your support and votes! As always, we at Rapid Intake will continue to bring our customers the best in eLearning.

Thursday, July 7, 2011

Deploying Your Course In Unison

After you have finished testing and managing any issues involved with your project, you are ready to deploy your course for the use of your learners.

1. After logging in, locate the project you are ready to deploy from the "My Projects" tab. Click on the purple circle with the arrow to the right of the project name.
If you are already viewing your project from the "Project Home" tab, you can click on the "Deploy The Course" icon.
2. At this point you have to decide on the form of deployment: either your learners will access the course from your website or LMS, or you will provide them a public link to the course that is located online on Unison. Instructions for both forms of deployment are given below.

The Differences between the Forms
  • If you decide to deploy the course to your website or your LMS, you will actually end up with a file that you will later have to transfer to your website or LMS. The advantage of having your course on the LMS is that your LMS will receive data about the progress of your learners during the course.
  • If you decide to send your learners a link to the course on Unison, the only way you will receive data about your learners is if you have allowed them the option of emailing you their scores. Otherwise they will navigate and complete the course without you receiving any information.

To deploy this course to a website or your LMS
1. If you decide to download the file for future upload to your website or LMS, click on the "Download" tab.

2. Select the format of your course in the pull down tab. You have the option of flash, mobile, or flash & mobile compatible.

3. Click on the pull down tab next to "Publish Method" to select the location to which you will publish, either a "generic Web Server" or "LMS."

4. Hit download.


5. Transfer the file to your website. The course will now appear on your desktop as a file. This file is ready to be transferred to your LMS or your website.


To create a public link to your course
(located online at Unison)

1. Click on the public link tab instead of the download tab.

2. Select the format of your course in the pull down tab next to "Publish Method." You have the option of flash, mobile, or flash & mobile compatible.

3. Hit Publish.

4. Copy the link that appears directly below the "Publish" icon.

5. Paste the link to your website or the email form given below the link. Add in the email addresses of your learners and hit send to email the link to them.

Adding a new user to an existing project

At some point during the development of your course, you may want to enlist the help of another person to add content, test the course, or help manage issues. You can add this person to your current project by adding a new user. If this person is not a "current user" at Rapid Intake, you will first need to get this person registered.

1. After logging in, click on the "Admin" tab at the top right. Under the "Users" heading, click on the link labeled "Add a User."
2.  Fill in the required information in each field and then select the level of the user (reviewer, developer, manager, or administrator) and click "Add User" at the bottom.
The new user can be seen if you click on "View/Update Users" under the "Users" heading.


3. To add the new user to an existing project, click on the "Admin" tab. Click on "View/Update Projects" under the "Projects" heading.

4. Locate and click on the project in the list of project names.

If you have a hard time finding your project, you can do a search for it if you know the name, ID, date added, or date due. Type in the name (or ID or a date) in the "Search" field and then use the pull down tab to select what type of information it is (name, ID, date added, or date due) and click on the "Search" icon.


5. Click on the project name in blue and underlined.

6. Locate the "assigned team members" heading on the left side of the screen.
7. Click on the "add/remove" link that is blue and underlined to the right of the "assigned Team Members.

8. Locate the user you want to add on the "User List" on the left and click on the name.

9. After the user name is highlighted in blue, click on the two arrows (>>) to add the name to the list of "Users Currently Assigned."

10. When you have all the new users you want added to the "Users Currently Assigned" list, click on the "Finished" icon.