
We have updated Unison to include the following new features:
- Enhanced Issue Tracking: We have upgraded the issue management system to include a color indicator on the "My Projects" tab, making it quick and easy to identify how many open, verify, and closed issues you have been assigned. There are now two ways to view the issues, and even a way to make an issue "private."
- Customized Reminders: Administrators now have the ability to email customized reminders to team members.
Enhanced Issue Tracking
Assigned Issues
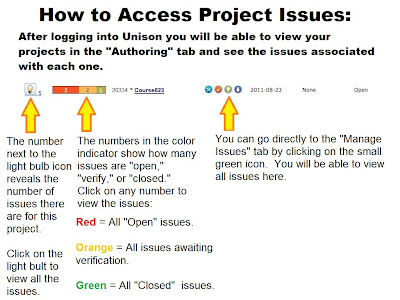
 When you open the "My Projects" tab, you will now be able to just glance at the issue color indicator to see how many open, verify, and closed tickets have been assigned to you on each project.
 Viewing the Issues
If you want to view the complete list of all issues, click on the light bulb icon. If you want to view only the open issues, click on the number in red on the color indicator. If you want to view issues that need to be verified, click on the number in yellow on the color indicator. If you need to view issues that have been closed, click on the number in green on the color indicator.
 There are also two ways to view the issues. Once you have clicked on the issues (either the light bulb icon or from the color indicator), you can change the way you view the list of issues by clicking on the row or grid icons.
View as Row

View as Grid

To read more information about the advantages of viewing the issues in grid form, please click the link to read the "Grid vs Row" blog post.
And, as always, you can click on the "Download Excel" link to down load the list of issues as an Excel spreadsheet.
Making Issues Private
You can make new and existing issues private (hidden from reviewers) by going to the "Manage Issues" link under the "Authoring" tab. Click on "Add a New Issue" (or click on edit for an existing issue) and check the box next to "Private Note" under the issue text field.

Adding Customized Reminders
 To send a customized reminder for an existing course, click on the "Admin" tab and then click on the "View/Update Project" Link.
Locate the project and then click on the project name. You will now be able to view the "Project Information" and "Optional" expanding menu (as illustrated in the image to the left.
Make sure that your project has a due date, and then select the team members to whom you want to send an email reminder, select the day, and type in a personalized reminder message. Your team members will receive this reminder by email.
No comments:
Post a Comment