Monday, July 18, 2011

Nominate Rapid Intake Tools for Best of Elearning!

The time has come for the
7th Annual Best of Elearning! Awards

WHAT? The Best of Elearning! Awards is a reader’s choice awards program for e-learning products and services. The 2011 ballot features many different categories, but this year we are inviting our customers to nominate Unison and mLearning Studio for the "Best Rapid Development Tool" and the "Best Mobile Learning Solution."

HOW? It is so easy!
  1. All you have to do is click on the link to go to the Best of Elearning! 2011 Ballot.
  2. Scroll down until you get down to category #10. Best Rapid Development Tool and #17. Best Mobile Learning Solution.
  3. Type in "Rapid Intake" for the company field and "Unison" or "mLearning Studio" for the product, depending on which you use. Type in what it is that you like most about the products. This may include: collaborative development, Flash and/or HTML5 publishing without having programming experience with either one, integrated REVIEW features, and the selection of content (learning games, quizzes, tests and more).
  4. Scroll down to the very bottom and fill in the Ballot Validation information (Customer name, company name, etc.) and click on "Submit."
WHEN? Ballots are accepted NOW and until August 1st.

Thank you for your support and votes! As always, we at Rapid Intake will continue to bring our customers the best in eLearning.

Thursday, July 7, 2011

Deploying Your Course In Unison

After you have finished testing and managing any issues involved with your project, you are ready to deploy your course for the use of your learners.

1. After logging in, locate the project you are ready to deploy from the "My Projects" tab. Click on the purple circle with the arrow to the right of the project name.
If you are already viewing your project from the "Project Home" tab, you can click on the "Deploy The Course" icon.
2. At this point you have to decide on the form of deployment: either your learners will access the course from your website or LMS, or you will provide them a public link to the course that is located online on Unison. Instructions for both forms of deployment are given below.

The Differences between the Forms
  • If you decide to deploy the course to your website or your LMS, you will actually end up with a file that you will later have to transfer to your website or LMS. The advantage of having your course on the LMS is that your LMS will receive data about the progress of your learners during the course.
  • If you decide to send your learners a link to the course on Unison, the only way you will receive data about your learners is if you have allowed them the option of emailing you their scores. Otherwise they will navigate and complete the course without you receiving any information.

To deploy this course to a website or your LMS
1. If you decide to download the file for future upload to your website or LMS, click on the "Download" tab.

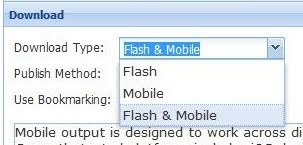
2. Select the format of your course in the pull down tab. You have the option of flash, mobile, or flash & mobile compatible.

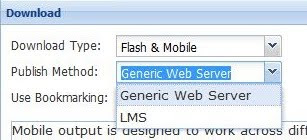
3. Click on the pull down tab next to "Publish Method" to select the location to which you will publish, either a "generic Web Server" or "LMS."

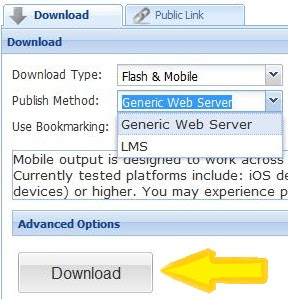
4. Hit download.


5. Transfer the file to your website. The course will now appear on your desktop as a file. This file is ready to be transferred to your LMS or your website.


To create a public link to your course
(located online at Unison)

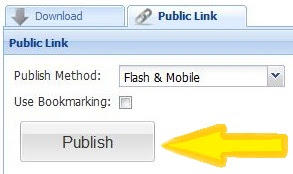
1. Click on the public link tab instead of the download tab.

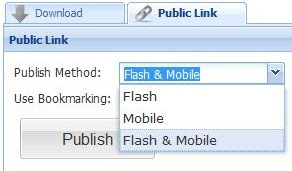
2. Select the format of your course in the pull down tab next to "Publish Method." You have the option of flash, mobile, or flash & mobile compatible.

3. Hit Publish.

4. Copy the link that appears directly below the "Publish" icon.

5. Paste the link to your website or the email form given below the link. Add in the email addresses of your learners and hit send to email the link to them.

Adding a new user to an existing project

At some point during the development of your course, you may want to enlist the help of another person to add content, test the course, or help manage issues. You can add this person to your current project by adding a new user. If this person is not a "current user" at Rapid Intake, you will first need to get this person registered.

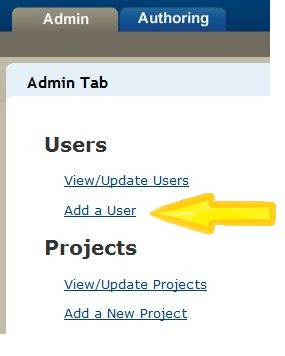
1. After logging in, click on the "Admin" tab at the top right. Under the "Users" heading, click on the link labeled "Add a User."
2.  Fill in the required information in each field and then select the level of the user (reviewer, developer, manager, or administrator) and click "Add User" at the bottom.
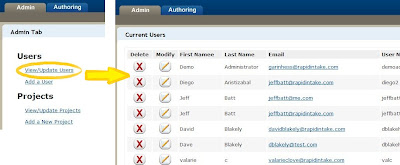
The new user can be seen if you click on "View/Update Users" under the "Users" heading.


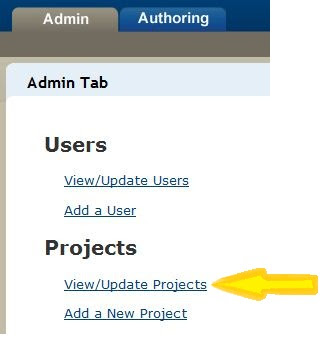
3. To add the new user to an existing project, click on the "Admin" tab. Click on "View/Update Projects" under the "Projects" heading.

4. Locate and click on the project in the list of project names.

If you have a hard time finding your project, you can do a search for it if you know the name, ID, date added, or date due. Type in the name (or ID or a date) in the "Search" field and then use the pull down tab to select what type of information it is (name, ID, date added, or date due) and click on the "Search" icon.


5. Click on the project name in blue and underlined.

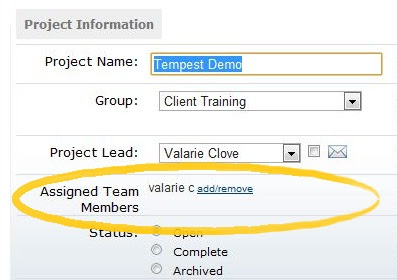
6. Locate the "assigned team members" heading on the left side of the screen.
7. Click on the "add/remove" link that is blue and underlined to the right of the "assigned Team Members.

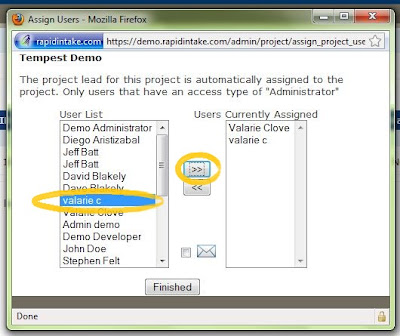
8. Locate the user you want to add on the "User List" on the left and click on the name.

9. After the user name is highlighted in blue, click on the two arrows (>>) to add the name to the list of "Users Currently Assigned."

10. When you have all the new users you want added to the "Users Currently Assigned" list, click on the "Finished" icon.